Understanding Styles in Microsoft Word
To use styles, I believe it's helpful for one to understand their purpose, which is to provide standardization of formatting through a document or a group of documents. There are other benefits to using styles in Microsoft Word, though, and you'll learn about them here.
If you already understand styles and would like to visit our extreme tutorial, click here.
What is a Style?
A style is nothing more than a specific set of formats that are saved "as a set", which is called a "Style". For instance, when you read a paperback book, virtually every chapter's title looks the same. Perhaps it is Times New Roman, Bold, 18-pt, and centered. When you read a textbook, each Tip may have the same border around it, and each exercise may have the same red font used as its heading. Styles help us do this. They're so easy to use, but not quite as easy to understand.
Gotchas
One of the biggest problems with using styles is that people create this gorgeous template with styles, and then copy information from the web or other external documents, and now there are 20 more styles in your document. It's difficult to restrict this from happening, particularly if you're not the only user of the template. See this article for more information.
Another problem is often caused because we use the default Heading 1 style and alter it to suit us. Then someone else comes along who isn't aware of styles, and they decide to italicize it. Rather than changing the style, they manually italicize each Heading 1. Someone who knows what they're doing comes along and doesn't get the same result when they apply the Heading 1 style. Doh! When and if you create styles in a template, do a final review to ensure absolutely that all the styles have been properly created and/or changed.
Outline numbered styles can be tricky. See this article for more information.
Styles have a setting to Automatically update. I wish they didn't. See this article for more information.
What Styles to Use?
I prefer to use the built-in styles whenever possible. Using, for instance, the Body Text style, I can alter it. This does not affect all documents, it only affects the active document or-documents from this template. However, you can create your own custom styles. See this article.
Typical Styles
When I develop a template for a manual, I generally include the following styles:
- Headings 1, 2, and 3 (sometimes 4 and 5, but more than 5 is a bit ridiculous and should be used only for the most technical of manuals)
- Body Text
- List Bullet and List Bullet 2 (for 2 different levels of bullets)
- List Number and List Number 2 (for 2 different levels of numbering)
- Note (or Tip; I usually put a border on this)
- Graphic (provides great spacing)
- Caption
- Header and Footer styles and page number styles are auto-created when you use headers and footers, and I don't usually alter them.
- TOC styles are auto-created when you insert a Table of Contents and I often add spacing before the TOC1 style.
Components of a Style
There are two types of styles: Paragraph and Character.
Paragraph Styles
A paragraph style has more format possibilities than a character style. For instance, a paragraph style could be bold and also double-spaced.
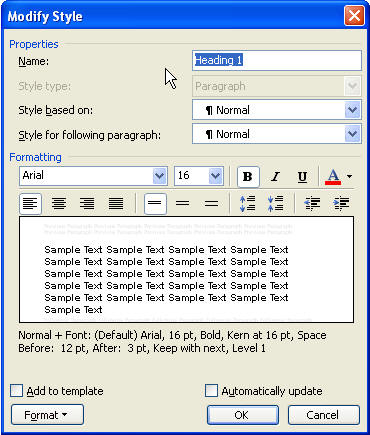
Above we show the dialog for modifying the Heading 1 style.
-
We have the Name, which I hope is self-explanatory. The Style type in this case is Paragraph.
-
Style based on tell us that Heading 1 is based on the Normal style. Now, suppose we change the Normal Style to be red? Since you can see that the Heading 1 style has no special font color designated, it would indeed take on the red font we apply to the Normal style. I prefer to base my styles on No Style, which is a choice in the drop-down. This way, each of my styles is independent. While I may understand that styles are based on other styles, other users of my templates may not (and it happens to be rare that I personally use a template I have created).
-
Style for the following paragraph denotes what style a new paragraph defaults to when you hit Enter while you're in a paragraph that uses Heading 1. For Heading styles, I will generally make the Style for following paragraph be Body Text. However, if you're using outline numbered styles, you might want it to default to Heading 2. Alternative, when I create my Graphic style, I like the following paragraph to default to be the Caption style because I always put Figure titles below my graphics.
For List Bullet and List Number, the likely following paragraph would be another List Bullet or List Number, so I leave them to be the same style.
-
I rarely use Add to template unless I am working on a document that was created from a template, and realize I forgot to italicize the font or something, but this does add the style to the template as well as the document on which you are working. If your document is not based on a template, you'll want to avoid this setting.
-
I rarely use Automatically update. The only styles I use that have this checked are the Table of Contents (TOC) styles. If you change a paragraph to which TOC1 is applied to become italicized, all paragraphs with TOC1 applied to them will become italicized when this option is checked.
Character Styles
A character style might be any text that is bolded. For instance, suppose we always want our company name to appear in bold red font, regardless of the formatting of the paragraph in which that text resides. We can create a character style for it. I've called it MyCharStyle in the graphic below.
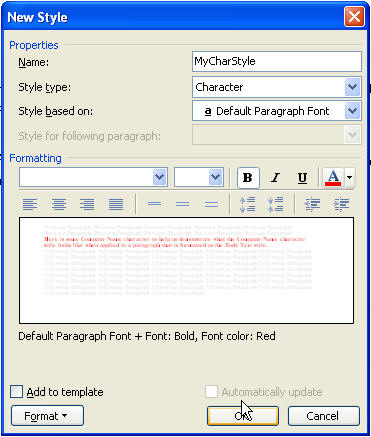
Unfortunately, when I apply the MyCharStyle style to some of the words in a paragraph where the style is already bold, it unbolds it, as you can see below, so be careful what font attributes you choose when creating your own character style.
The following attributes cannot be built into Character styles: Tabs, paragraph spacing, paragraph alignment, paragraph indents, bullets, numbering.