An Extreme Tutorial on Creating Fill-In Forms in Microsoft Word
Discussion
This is a long article. There are over 40 graphics alone, and it's equivalent to 17 pages in Word. For best results, try to review it when you have some quiet time to dedicate to it.
Some people call these online forms. I prefer not to call them that because I find it confusing. An online (or on-line) form is a form that is on line-on the Internet! So I call them Fill-In forms.
If you are a proficient Word user or if you already know a little bit about forms, you may only need our "regular" Fill-In Forms article.
See the Related links at the end of this article for more information about and help with fill-in forms. See my FAQ for even more information.
(Experts, I welcome your suggestions for making this article better!)
Creating Contract-Type Documents
Saving and Distributing the Form
Preparation
Whenever I create any page layout, I like to see everything. As always, make sure you have your Show/Hide button on. Also make sure you have followed my recommended settings for Word and my recommended AutoCorrect options so you can most easily follow these instructions.
Make sure you are in Page Layout view by choosing it from the View menu and that you can see the width of your page by choosing Page Width from the Zoom dropdown box.
Forms Toolbar
Please read my article on creating Fill-In Forms and then come back to this article and continue...
Creating Contract-Type Documents
Contracts and other forms can be typed like normal documents, with form fields inserted wherever the data is variable (changing each time).

Using the ab| button, we've inserted a text form field (see the gray dotted area) in which the person's name will be typed. If that name is Anne Troy (me), it will look like this when completed (the word end is at the end of the first line of the sentence):

If that name is Ellen Gottesdiener, then it will look like this (note where the word end is now):

So if you'd like your contract to have the text in exactly the same place each time you print it, while the information will change in length, this is very difficult to do and I encourage you to simply accept that your contracts may look slightly different from one to the next. One thing I do suggest is using a different font for the form fields. This helps the "filled-in" text to look different from the rest of the document so that it "jumps out" at you. In this case, Arial 12 pt is the form font and Times New Roman Bold 14 pt is the form field font. It might look something like this when printed:

Using Tables as the Basis
Our tutorial really begins here. Most people seem to be creating fill-in forms that they previously purchased and typed or filled in by hand, which is the perfect reason to use fill-in forms and the perfect reason to use tables to lay them out. Please don't attempt to try to create a form like this without using tables. You'll be sorry, truly.
Scenario: Someone has emailed you this document and said "Turn this into one of those Word forms..."

The steps to complete this task are below. If you follow along with me, you'll likely find that I've covered everything, so don't do anything ahead of time.
Step 1. Download
Download the sample files. Unzip to a folder on your hard drive. Open sampleoldform.doc.
Step 2. Toolbar
Turn on the Forms toolbar.
Step 3. Table
Insert a table. When you do this, we will want as many columns as we need cells going across. We also want to choose the row that will require the MOST cells. In this case, we'll use the City/State/Zip row. We count once for each label (i.e., city, state, zip) and once for each fill-in area, so that's 6. We need 6 cells going across. So let's insert a 6-column, 2-row table ABOVE the existing text:
- First hit the Enter key several times to move the old information down out of our way.
- Hit TableInsertTable and type a 6 in the first box to get six columns.
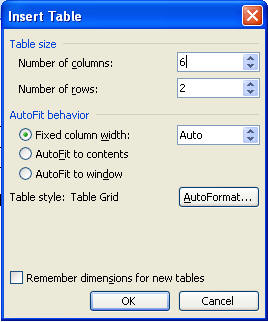
We've made two rows so that you'll always have the 2nd row as our "copy row". When we create a new row, our "copy row" is copied, so we always want it to be a row that's got the max cells we required. This will make more sense later.
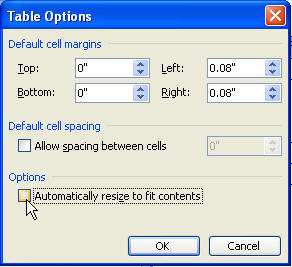
Important Tip: Click inside your table anywhere. Hit TableProperties from the menu. Click the Options button and UNcheck Automatically resize to fit contents. If you don't, you'll go nuts. :)
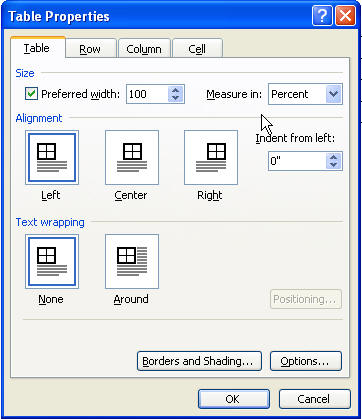
With the table still selected, hit TableProperties and set the table's width to 100 Percent. (Note that typing 100 into the width box automatically changes the Measure in to Percent.)
Step 4. Begin Designing Rows
Now, since the second row is our "copy row", we don't want to touch it ever, really. But we want the first row to be like the first line of our old file. So click in the 2nd cell in the first row. Holding Shift, hit the right arrow key twice to select the 2nd and 3rd cells in the first row.
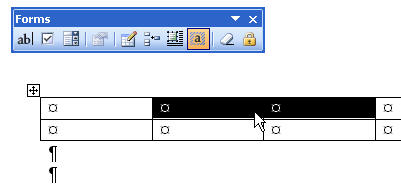
Now, hit TableMerge cells. This is how we get our table cells to line up vertically without a lot of trouble, while having different cell widths.

Do the same with cells 5 and 6 (now numbered 4 and 5) of the first row. So your table looks like this:

Now, do the following:
-
In the first cell, type "Name" and hit tab.
-
In the second cell, hit the ab| button on the forms toolbar.
-
In the third cell, type "Date" and hit tab.
-
In the fourth cell, hit the ab| button on the forms toolbar.

Now, you might think "that's a lot of room being taken up for the labels!" or "I want my rows taller!". But let them go until you're all done your form-we'll cover it later in this article. You'll do a lot less tweaking that way.
We're done row 1. Let's click in the last cell of the last row and hit tab to create a new "copy row". Then, select all EXCEPT the first cell in the second row. You can do this with your mouse or Shift+Right arrow keys.

Merge those five cells together. Type "Address" into first cell in row 2 and insert an ab| (text) form field into the second cell in row 2.
Again, let's click in the last cell of the last row and hit tab to create a new "copy row". We now have four rows, and your table should look like this:

For row 3:
-
Type "City" in the first cell
-
Place a text form field in the second cell
-
Type "State" in the third cell
-
Place a text form field in the fourth cell
-
Type "Zip" in the fifth cell
-
Place a text form field in the sixth cell
Okay. You've learned how to create "plain old" form fields for text. Now for the more fun part, at least in my opinion.
Formatting Dates
Double-click the form field next to the Date cell. Change the Type to Date and choose the MMMM d, yyyy date format from the dropdown. Hit OK.
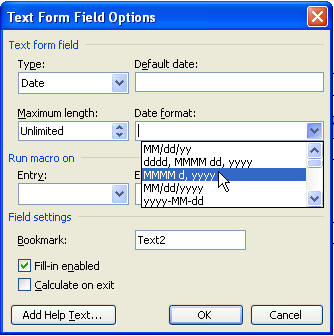
If someone types 1/17/2006 into that field, it'll display as January 17, 2006 when they tab out of the field.
Formatting Numbers
Double-click the form field next to the Zip cell. Change the Type to Number. Type "00000" into the Format box, ignoring the dropdown. Now, if someone types 3443 into the Zip form field, it'll change to 03443 when they hit tab. This is called "leading zeroes", which is especially helpful if you have long account numbers to fill in. You could also set the length to 5 to be sure no one tries to type a Zip + 4 or non-US code in there if that were something you desire.
Drop-Down Form Fields
What if you only do business in three states in the US? Suppose they are what we call the "Tri-State Area"? I am sure many people have them. Ours is Pennsylvania, New Jersey and Delaware. So if I were, for instance, licensed only in those states, I might want to ensure that only one of these three values was used.
Click once on the State form field to select it. From the forms toolbar, click the 3rd button, which is the Drop-down form field button. Double-click the new State form field you just inserted.
-
Type "PA" and hit Add.
-
Type "NJ" and hit Add.
-
Type "DE" and hit Add.
-
Hit OK.
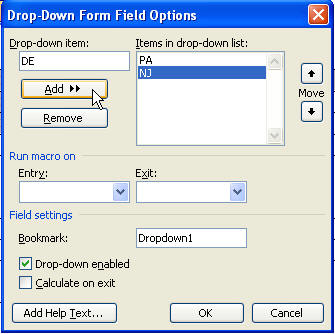
After you add DE, move it to the top, and move PA to the bottom so your choices are alphabetically listed. However, you will probably want your choices listed from most chosen to least chosen if that applies.
If you've followed me along, your State now looks like this:

"Well, that sucks!" you're thinking, because you wanted to use this form for people to fill in by hand, too! No problem. Double-click the field again. Add a new entry of SPACES (yes, just hit the space bar) that is the same number of spaces as your longest entry, or even a few more. Here, we just hit the spacebar five times, then hit Add. Note how the "blank one" is selected.
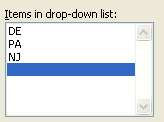
Move it to the top using the Move buttons and hit OK. Your form field is now "empty" again. If you only used two spaces, it'd be a very tiny form field-it's much more visible using five spaces.

Default Text
Suppose most of your work is done in a particular city, so that more than 50% of the time, the city is Philadelphia? Double-click the City form field. In the Default Text box, type "Philadelphia". Hit OK.
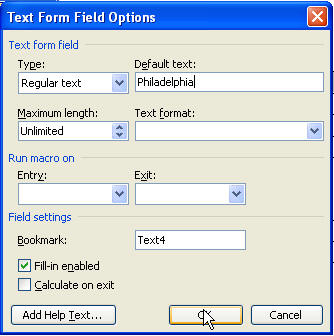
Using default text keeps you from having to type Philadelphia most of the time, but allows you to change it if it's not Philadelphia.
Here's our form now:

Checkboxes
We're not going to add any more rows, now, because we're on the last row that we need, so we'll use our "copy row".
Type "Gender" into the first cell of the fourth row. In the second cell type "M", hit the spacebar 3 times and type "F".
Click in front of the M and insert a checkbox. Click in front of the F and insert another checkbox. I like to have at least one space between my checkbox and it's "label" and 3 spaces between checkbox choices. Note that you could use a drop-down for Male/Female, too. Your choice. Think about how often you look at this form and need information "at a glance". If you're in a physician's office, you may often look at Gender, or perhaps it's only something you ask for statistical purposes. You are the best judge in making your form legible and usable in your office.

Select the 2nd and 3rd cells and merge them. Don't worry. Your checkboxes won't be affected. Select the 5th and 6th cells (now the 4th and 5th since you merged two others) and merge them as well.
Type Pay Grade into what is now the 3rd cell in the last row. Insert a drop-down form field with E4, E5, and E6 as the selections from which the user can choose. Make a blank choice and put it at the top.
Tip: If you have a default choice from a drop-down, make it the first choice and don't use the "blank" choice.
Delete all the text leftover from the "old form" that's below your table. Your form should look something like this:

Making Pretty
Now it's time to make your form aesthetically pleasing (pretty). The following steps are just some suggestions. You'll learn to apply your own formatting in your own way.
-
Click inside the table and, from the menu, choose TableSelectTable.
-
Hit FormatParagraph and type 3 in the Space Before box and 3 in the Space After box. You may want to increase or decrease these numbers in certain rows of your tables, depending on the data to be typed in or if you're also going to use your form to be filled out by hand.

Now your table has a nice amount of white space, and it's much less difficult to read.
Tip: When designing forms, think about this: Decide whether it is more important to squeeze everything into one page or if it's more important that the form be legible at a glance. Again, in a physician's office, I think it's more important that the form be able to be read quickly, so I'd make sure there's lots of white space. However, if it's a form that's filled out, put into a file and rarely looked at again, crowd it up if you like, and don't bother with the step we just did.
Select your entire table again using TableSelectTable. Format the font as Arial 9 pt. Select the first form field next to Name and format it as Times New Roman 10 pt. Using the format painter, format all the other form fields the same way.
Tip: I've just learned something. It looks like the format painter won't work on drop-down form fields! Just select those and format them as TNR 10 pt individually.

While I would likely keep the borders on the cells with a form like this, you may not want to, so here I show you how to remove them.
With your table still selected, turn off all the borders by clicking the No Border button on the Borders toolbar button.
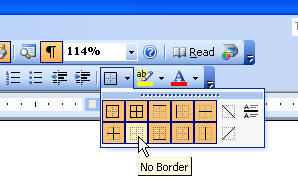
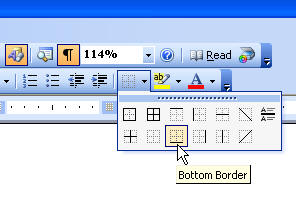
Now, click on the Name form field (or any cell that contains form fields) and put a border under it by choosing the bottom border only button. After you've done one of them, move to the next cell and use the F4 key to repeat that format (or use the Borders button again).
Tweaking Cell Width
Select the first column in your table and make the column skinnier by dragging the right-hand side to the left, then let go.
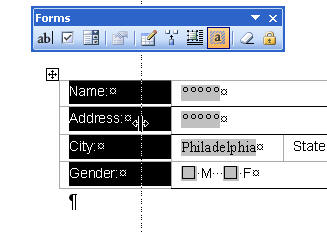
If you have difficulty because the "nudges" are too big (it jumps too much when you move it, and you can't get it exactly where you want it), hold your Alt key while you drag.
If you want the cell with Name in it to be skinnier than the cell with Address in it, then select only the Name cell and drag it's border to the left. However, forms look neater when more cells are aligned, so align as many as you reasonably can. If your labels are long, consider having the labels in one row, and the corresponding form fields below it in the next row.
You may even want to right-align your label cells so they're nice and close to the fill-in areas.
Here's how the final form would look in print preview:

You can compare your new form to our samplenewform.doc, which you previously downloaded.
Tip: Print preview DOES show form fields in gray if you are viewing them that way, but it does NOT print this way.
Restricting Entry Length
Here's the big one. Everyone wants to keep people from entering too many comments, which could make your form take 2 pages instead of 1 or just discombobulate so you no longer recognize it. There is no feature for this. While there is a feature to restrict to a given number of characters, how can you tell it not to let this person type in more than, say, two inches of text?
Set the row height to EXACTLY. In our sample form, perhaps you have filled the page, and now that people are using your form, you're finding that users put the street address, and then hit Enter and put an apartment number. You don't want them to do this, you only want them to use the single line. So set the row height of that row to EXACTLY by choosing the row and hit TableProperties, Row tab. In this case, our row height is about a quarter inch (you'll have to guess at it), and choose Exactly from the dropdown.
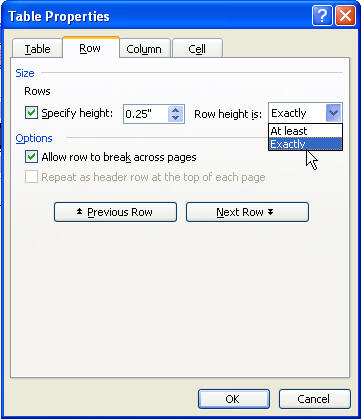
By doing this, even if someone continues to type, the text they enter will drop behind the cell below it instead of "pushing" your form. It seems meaningless for them to continue typing, so they're unlikely to do so. You will find that there's really not a better solution to restrict the height of form field entry.
Protecting the Form
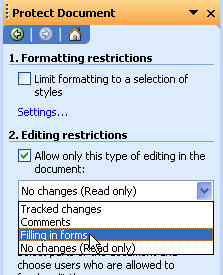
A fill-in form MUST be protected to be usable! While you're creating the form, go ahead and use the padlock icon on the forms toolbar. But once you've completed your form and before distributing it, use the "official" method of ToolsProtect Document and choose the checkbox under Editing restrictions, and choose Filling in forms. Whether you use a password or not is up to you.
Saving and Distributing the Form
I save all my forms as templates (DOT) files. I can't see any reason you wouldn't want to save it as a template first unless you were sending one form to many people, and they'll use the form only once. If the form is for company-wide use, then I'd ask the IT department to store it in the Workgroup Templates folder.
Version Gotchas
In Versions 2000 and below, you could protect a form, fill in parts of it, and unprotect it so you could tweak it. But when you reprotect it again, you lose everything you previously entered! Be careful!
FAQ
How do I enable spell-check in form?
Answer
from the MVPs
How can I unprotect my form if I've forgotten the password?
Answer
Can I protect just part of my form?
Answer
Can I allow users to insert graphics into a protected form?
Yes, but this requires special consideration and VBA.
Can I gather data from forms that have been returned to me?
Yes, but this should be well thought-out beforehand, and
requires VBA to compile all the data.
Can I keep people from entering too much info?
Yes, it's covered in this article.
Where did my data go when I reprotected my form?
See the Version Gotchas in this article.
Can I do calculations on numbers that are entered?
Answer
Can I duplicate data that's already been entered elsewhere in
the form?
Answer