Mail Merge Letters in Microsoft Word
Our demonstration uses Excel as the data source because it most commonly is. Who knows why Microsoft insists on pushing us to use Word (in older versions) and now Access (in newer versions) to store our data source files.
First, turn on the Mail Merge toolbar by going to Tools Letters & Mailings Show Mail Merge Toolbar.
Create a new, blank document or open the letter you've previously created. Select the Open Data Source button on the Mail Merge toolbar and browse to the file in which you have entered the addresses.

A new window opens up asking you to select the data source file. Change the Files of type to Excel files (*.xls), and then choose your file and hit Open.

Another window requests that you choose which worksheet or named range of the Excel file contains the data. Most often, you'll choose Sheet1 and hit OK.

At this point, if you want to choose only certain recipients, you can hit the Edit Recipients button on the Mail Merge toolbar.

Check/uncheck recipients, following the instructions at the top of the dialog, and using the buttons at the bottom. Hit OK.

If you haven't already done so, type the letter as you want to send it. Now place the cursor where you want the address to be printed in the Letter.
Click on Insert Address Block or, better yet, see this article to learn how to insert individual fields.

Select the options you need and click OK.

The merge field code is automatically inserted.

Tip: If you don't like the results of the Address Block, you can use individual merge fields instead. You can access them by clicking Insert Merge Fields on the Mail Merge toolbar. See this article.

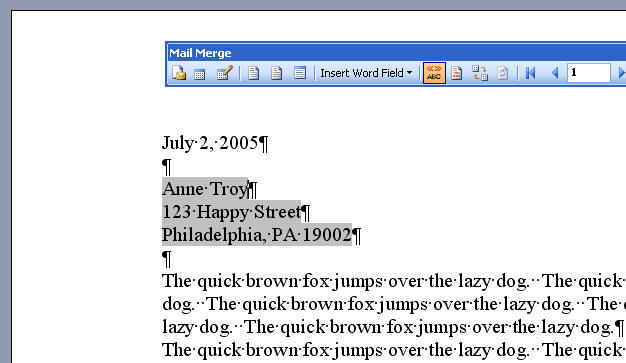
Click on the View Merged Data button on the Mail Merge toolbar if you'd like to see the results of merging the first record in your data source file.

Here is a sample of the results. Don't worry, that gray shading won't print.
You can browse through records by clicking the Next Record button on the Mail Merge toolbar. By viewing the first few records, you can ensure you get your expected results.

If you are happy with the "preview", turn off the View Merged Data button. If you will use your letter again later, save the document now.
Click the Merge to New Document or Merge to Printer icons to continue with your merge.
Merge to New Document

Choosing this option is safest. You'll be able to see all your merged letters at once. Please see this article for learning how to print only certain letters instead of all of them. (Generally, the new document that is created is printed and not saved by the user. You can instead create a new column in your data source file with a heading, perhaps, of "Sent Letter1" and insert the date in each record of the Excel file. So, instead of saving documents, your recordkeeping is stored in the data file.)
Merge to Printer
If you're confident that your mail merge has been set up properly, or you've run it before, you can use this option to send the documents directly to the printer.

Merge to Email
If your data source file contains an email address for each recipient, you can use the Merge to Email option.

Fill in the Subject line. Make sure you use HTML format if you have anything more than plain text in your document.
